Monday, January 30, 2017

Challenge #305

Today's sketch challenge comes from Try Stampin'~Or Not~On Tuesday's blog and is for Challenge #305.


One of my sister-in-laws has a birthday on Sunday, so this card is going out to her in tomorrow's mail. I used a small amount of patterned paper on the right side of my card and then utilized my new I-Heart embossing folder from FSJ on the white cored red cardstock that I then sanded and placed on the left. 

                             
The heart flowers and flower pot are colored with Spectrum Noir pens and I edged the white panel with charcoal ink to help it "pop" alittle against the background. I also outlined the hearts and Happy Birthday with my Stardust gel pen for a little glittery glimmer that you can catch a bit of in the last photo. 


Saturday, January 28, 2017

MOJO481: Happy St Patty's Day

Well, it's that time again to start preparing for the March card make -n- take at my local library. For this St. Patrick's Day card I took my inspiration from the card sketch over at the MOJO Monday blog.    

I used some bold patterned paper from my stash for the half circle and then made some of my own patterns by repeatedly stamping the shamrock in emerald ink onto the emerald stitched diecut cardstock rectangle and accented it with 3 gold staples. The Leprechaun was stamped in black and colored in with Prismacolor pencils. 

The gold gilded border of that square was done by swiping the edges of the cardstock with a very juicy embossing ink pad, sprinkling on gold embossing powder and then melting it with my heat tool. The sequin accents mimic the bling of some gold Leprechaun treasure to complete the look.  


Friday, January 27, 2017

Planner Bling -The beauty is in the details...

While spending some time in planner groups on FaceBook and browsing shops on Etsy as I learn my way around the wonderful world of planning, I have seen several examples of planner "bling"...anything from simple tassels to bejeweled dangles and I find all of them beautifully detailed and inspiring!

So I decided to tackle making one of my own. Since I spent a good bit of time several years back making jewelry, I still have lots of beads and findings left in my craft room stash, so I figured that was a good place to start.

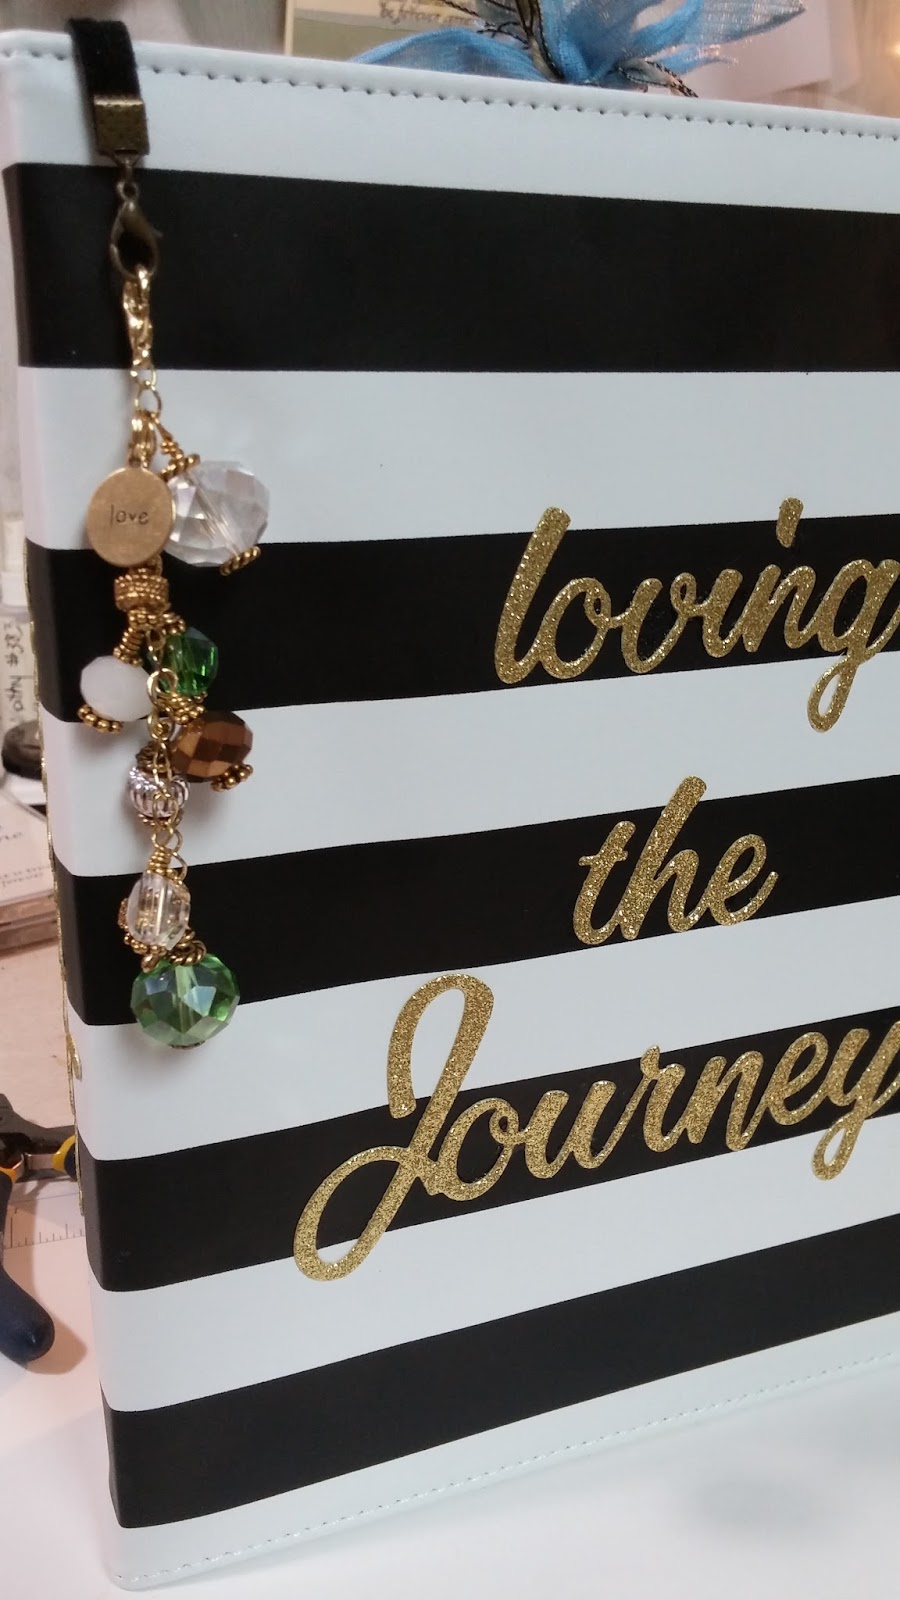
After gathering bits and pieces of things I thought might look nice together, I dug out my tools and got to work...what follows is the result of about 30-45 minutes of my time from start of the gathering to finish of twisting the last of the beaded pins onto the gold dangle chain. The resulting loop is then attached from the inside -to the top ring of the mini 3 ring planner binder.

Wish I would have thought to take a picture of the messy pile of chain, detail spacers, beads, head pins and tools I had on my desk before I got started...so that you could've seen a "before" and "after" picture...but, oh well -enjoy the "after" photos, even if it is hard to capture the brilliance and the sparkle.

Just like in life, I believe the Beauty is in the (little) Details ~ Happy Friday!


Wednesday, January 25, 2017

Playing Planner Catch-Up

I can't believe that February is almost here already...that seems so crazy to me! I just got done with the January calendar spread in my new planner and now it's time to start working on February's, lol. For this layout, I used a themed sticker pack called Winter Wonderland from Simple Stories along with some mini washi tape...enjoy...I love the way it turned out! This sticker pack is a great value at only $5 for all 8 sheets and I barely made a dent in them.


Sunday, January 22, 2017

FMS271

Today's card was made using sketch #271 over at the Freshly Made Sketches blog.


I just love doing chalk blended backgrounds! The look is so soft and dreamy and reminds me of what I see others doing with Distress Inks...I don't have any of the Distress Inks, but I have the Ranger foam blending tools and many, many TAC fluid chalk ink pads. Two shades of aqua/teal were used here along with silver heat embossing and silver glitter Washi tape. Washi tape is a relatively new paper crafting discovery for me and I think I am in LOVE, lol!

This card is getting mailed out to my sister and her hubby for their 18th wedding anniversary this week...so Sis, if you read my blog- sorry for the sneak peak of your card ;)


Thursday, January 19, 2017

heARTful stamping challenge -week of Jan 15- Heat Embossing!

Today's card share is one that was a bit time consuming to make, due to all the bits and pieces that were stamped, embossed and diecut. But I made it for my Mother-in-Law's upcoming birthday because she collects Snowmen...here's to hoping she loves it!

The challenge @ heARTful stamping this week is to incorporate Heat Embossing -which I did on the base of the snowglobe of my card. I used my own unique blend of embossing powders that I mixed up several years ago that includes mostly gold, some silver, burgundy and I think even some navy...I call it "antiqued" and here it was used on top of brushed silver metallic paper, which gives it a really interesting look that was kinda hard to capture in a photo, but adds alot of dimension.

The "glass" globe was stamped in white Staz-on ink onto an acetate sheet, paper pieced on the back side and then die cut out. The blue frame was sanded for a distressed look and light blue snowflakes were stamped along the card edges. The snowflakes and snowmen were also die-cut out and all are part of a silicone stamp set/die combo set that I got from Paper Wishes/Hot Off The Press in fall of 2015. The globe "sits" in the base and then I used large Foam adhesive dots to raise it up off the card front..."When in doubt -pop it out!" ~says Richard Garay


1/23/17 update: WOOHOO!!!


Tuesday, January 17, 2017

RRCB54: Let It Snow

Today's card was made with the challenge from the Retro Rubber Challenge Blog in mind -along with needing a simple winter themed card for an up-coming class at my local library.


I used long retired stamps from The Angel Company (TAC) that I am guessing date sometime prior to 2010 because they have been in my stamp stash since FOREVER ago, lol!!! I used the Pocket Cuts Die Set from Fun Stampers Journey (that are on sale for 30% off this month!) to create the Polaroid photo inspired frame, then embossed with a polka-dots embossing folder and sanded the frame to bring out the white "snow". Lightly stamped snowflakes grace the edges of the card and the water color penciled snowmen take center stage. As per my usual, I added some sparkle with my favorite glittery gel pen on the details of the snowmen. Light blue Organza ribbon neatly finished up the top folding card and now we are ready for the Make-N-Takes at the library next month too!


Updated 1/30/17: WooHoo!!!


Monday, January 16, 2017

It Was a Weekend of Planning

Spent a relaxing Sunday afternoon coloring the January "feathers" divider in my new planner and working on this week's spread.

 For the coloring, I used Spectrum Noir alcohol markers and then shaded with Prismacolor pencils on top. I finished up by adding some Journey Glaze for dimension on the word January and added some subtle shimmer with a clear Wink of Stella pen & a Stardust GellyRoll pen -too bad the camera doesn't pick that up very well, as it is very pretty in person!

The weekly spread was done using a sticker sheet from a value pack I found at Michael's last week that are made for the Me and My Big Ideas (MAMBI) Happy Planner -but as you can see here, they worked just fine, even when being used on a horizontal layout!


Saturday, January 14, 2017

A Planner's Gotta Plan!

Well, it's been years since I've used any kind of a planner, but it feels good to get back to being organized and having the opportunity to combine it with papercraft arts -what could be better?!? Who knew there is a whole world of creativity out there within the Planner Community!

I am starting out with the basic black and white Everyday Life™ Stripes Album & Planner Pages Bundle from Close To My heart...They had a Boxing Day sale that I just couldn't resist and I was sold once I realized it came with monthly coloring-page dividers, lol. Of course, I had to take it one step further and bling out the cover to personalize it with die-cut gold glitter paper words. I also wanted to do a pocket page dashboard with a new theme each month.

My package finally arrived on Wednesday, 10 days after it was first shipped from Utah -after getting placed on the wrong truck and sent to all the way to West Virginia by Fed-Ex last Friday when it was docked only a half hour from my home in south central PA and supposed to be delivered the very next day...needless to say, I was very excited to get started! The first thing I did was make a clear acetate sheet for the front and back of the album to keep everything protected and in it's place. After that, I set out to make a removable "Today" page marker using the same acetate, some gold scrapbooking stickers and glittery washi tape.

For the opening dashboard, I used a pocket page by Simple Stories from FSJ that I added some additional hole punches to (so that it would fit in my planner's 3 ring binder). I used long retired coordinated papers from CTMH, stamps and ink from TAC, glitter and diecuts from both SU and FSJ, and liquid glass glaze from CTMH. The paper clips are backed with felt and attached with hot glue. I took lots of pictures of the progress as I went...so here ya go: