Monday, October 30, 2017

Metallic and Masculine Missing You


Today's card is my creative contribution to this week's sketch for the Atlantic Hearts Sketch Challenge and will also be entered @ 613 Avenue Create for "Anything Goes -Masculine"


Hopefully I won't confuse you with this picture, but I wanted to show a way that I use up some of my scrap paper...the card base is made using a light gray A2 top folding card, but the silver layer was done using a piece of cardstock that I had previously cut two christmas ornaments out of for another card. Once the layers are glued together, you will never even know those holes are there!

  
The two main stamp sets that I used are retired from Close To My Heart. I stamped and embossed the ribbon stripe three times in shades of silver metallic on a darker shade of gray cardstock to mimic the sketch after I treated the cardstock with an anti-static tool.


The blossoms were heat embossed in silver on the same lighter gray as the card base and cut out with the co-ordintating die set.


I used a large punch to cut out a vellum circle to help ground the blossoms before I adhered them to the card front -the smaller one was popped up with foam tape, as was the LOVE square in the bottom right corner.


It still looked like it was missing something, so I added a large clear sequin with a small rhinestone in the center to complete the visual triangle with the center of the blossoms.


Inside, I stamped and embossed the "Missing You" sentiment in silver. That's it for me today -come play along with us at Atlantic Hearts!


Until next time~


Saturday, October 28, 2017

How to Make a Tiny Shabby Chic Box Using ScraPerfect


The first step in today's 3D box project was to die cut two halves of the box design using a Spellbinder's box die from cream confetti cardstock. Then I sent it through my Amaze machine using the brick pattern side of this M-Bossabilities folder...because these folders are double sided and therefore thicker than a standard embossing folder, it took a bit of finagling to get just the right sandwich in my machine, but I made notes after I got it right so that it will be a breeze the next time around.


The next step was to highlight the texture using Frayed Burlap Distress Ink to showcase the raised pattern. This was so easy to do and I love the way it turned out!


Putting the box together went super smoothly with the help of the Best Glue Ever (using the No Clog Writing Cap) because I added it to the flaps and let it dry a bit so that it wouldn't ooze out past the seams and so that it would get super tacky and grip the textured surfaces without a problem. (thought I had taken a pic of this step, but apparently I did not -sorry!)

But did you know that the No Clog Writing Cap works for more than just the Best Glue Ever? The cap comes in several sizes that fit different sized bottles and the small one fits the Stickles bottle perfectly! Now I love using my glitter glue again!!! And having control over where it ends up is priceless, lol. So I used it to enhance the center of this flower from the Poppy Paper Medley set from Itsy Bitsy.


Once assembled, I also tied the handles with a little jute string to secure it and adding the butterfly to the knot on the bow using the Best Glue Ever, once again, was no problem. This glue is truly a joy to work with!


To give you an idea of the truly tiny size of this box, I took a picture holding it for a size comparison to my hand...it is just the right size to hold a small treat -like a mini chocolate bar or 2 chocolate kisses etc.


I also used the Distress ink to add a shabby look to the blue flower and better tie it in to the colors  used on the box.


The last thing I did was spread a tiny bit of the Stickles along the rolled paper body of the butterfly with my finger tip so that she could sparkle too.


 That pretty much wraps things up here for me today...until next time, happy crafting with ScraPerfect~


Wednesday, October 25, 2017

Something Borrowed & Something Blue


Today's card is the final wedding card I'll need for our family for 2017. I was inspired by sketch #367 @ the Paper Players and it will be entered @ Happy Little Stampers for "October Anything Goes with Dies", @ Shopping Our Stash for "That's Sketchy" and @ Ike's World for "Anything Goes -Celebrations". 


The tiny wooden stamp I used is from a retired tag set from Stampin' Up and the larger sentiments set is also retired but from Close To My Heart. Both of the dies are from Spellbinder's. The A2 card base and white cardstock layer are a beautiful white shimmer paper, the silver is a shiny mirror paper and the blue wrap with the lace actually came from the wedding invitation itself -so I did a little bit of recycling to make it more personal for my nephew and his new bride.


This is a rather simple card, with just the layers and sentiment stamping, but I did need to utilize the stamp omitting technique to fit the sentiment on the front of the card the way that I wanted to. What that means is that I used the small square sticky note to cover up and ink the separate portions of the stamp so that only the Best Wishes was stamped on the diecut label and the rest on the actual card front. 


This took several steps to get just right in the spacing, but that's where the beauty of a stamp positioning tool comes into play. I played with some scrap paper and gray ink under the diecut frames until I got everything just right and then I committed to the actual card pieces with embossing ink and silver powder. I made sure to also use the Perfect Crafting Pouch to reduce the static on my card stock and keep the embossing powder where it belonged.


The finished card is clean, simple and personalized...hopefully they like it as much as I do, lol! I used foam dot adhesive to pop up the layers of the diecuts. I also heat embossed the inside sentiment. Now all I have to do is wrap the gift before Sunday!


Until next time~


Monday, October 23, 2017

Fintastic Birthday Set


Today's projects were created for the Itsy Bitsy design team using another of the adorable new clear stamp sets they just released earlier this month. This one is called "Fintastic Birthday" and it was so much fun to work with!


I decided to think outside the box a little using the Stitched Square Thin Cut Dies...I layered them and cut the pieces out of a scrap piece of white fun foam two times and then I turned the foam shapes into stamps. Using a temporary adhesive, I adhered the 4 foam shapes to both sides of two small acrylic blocks and then stamped an alternating background design using the Green and Royal Blue Pearl Pigment ink pads on a 6" x 6" white card front. While this design is a rather basic geometric example, any die cut you have can be turned into a stamp this way- And it's so much fun to do!!!


I also diecut a square from a White Glitter Sheet to layer on the card front. Another, slightly smaller, square was die cut from white cardstock and then shaded with the Royal Blue ink using a round sponge ink blender to get that circular, bubbly underwater look behind the octopus. I also used the blue ink on the blending sponge tool to fill in the empty white space at the bottom of the card front.


I stamped the cute little octopus in Black Chalk Ink on white card and colored him using a blending sponge and the Green Pearl ink. I then fussy cut him out and adhered him to the blue square using Mini Adhesive Foam...I did the same with the blue square to add it to the white Glitter sheet to add dimension. I hand trimmed the banner for the sentiment and layered it on more Glitter Sheet paper. I also attached 3 Silver Foil Jewelled Florettes to the top left side using more mini adhesive foam.


On the inside, I stamped the octopus in the middle first, then stamped again 2 times without re-inking the stamp to get the lighter shades of the Black Chalk Ink. I added some soft blue and green ink behind them and then did the same to stamp the sentiment 3 times.


Since I don't like to throw anything away, I ended up with a bonus project using the foam pieces once I was done stamping with them and had removed them from the acrylic stamp blocks. I stamped using the tiny fishes onto a bookmarker and topped it with some matching fancy floss from my stash. I think it will make a cute little tag on the top of a birthday gift.


To make my own envelope for this card, I paired a 12" x 12" piece of patterned paper from my crafting stash with the Envelope Punch Board. I trimmed the paper down to a 9.5" square and followed the printed directions on the Punchboard. It's such a useful tool that I utilize often! Here is a quick video from Itsy Bitsy's You Tube Channel that showcases the Envelope Punch Board, in case you are wondering more about how it works:


Front of the bookmark tag:


Back of the bookmark tag:


Sometimes when making my own envelopes I will put the pattern in the inside so that it is easier to address and then pop in the mail, but I know this will be hand delivered, so I put the pretty pattern on the outside instead.


That's it for me today -thanks for having a look and please let me know if you try making your own stamps from diecuts too! Until next time, happy crafting with Itsy Bitsy~


Friday, October 20, 2017

Pretty Fall Tent Card


Today's card was designed to teach a new concept to the gals at my local library by showing them how to make a Tent Card in November. This card will be entered @ Words 2 Craft By for "Autumn", @ The Crafty Addicts for "AG/Autumn Colors", @ Moving Along With the Times for "Autumn/ Fall", @ DL Art for "Thankful Thursday/Fall Colors", @ Creative Knockouts for "Fall", @ Double D for "Leaf It To Me", and @ City Crafter for "Pumpkins".


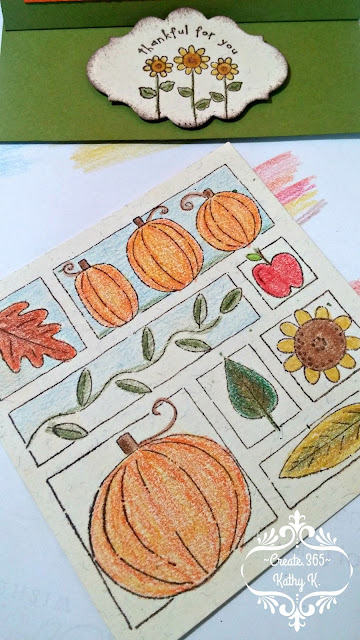
Using the size of the focal stamp as my guide, I cut my card base from olive green cardstock and scored it twice...once for the spine of the card and then again horizontally in the center of the front panel. I cut a layer from orange cardstock and trimmed around the ivory panel after stamping the image (this set was retired from Stampin' Up!) in brown Memento ink.


Using a label die cut set, I cut out the inside sentiment "stopper panel" and then sponged the edges with the brown ink after stamping the flowers and the sentiment. All coloring and shading was done with colored pencils.


So that the "stopper" would be effective at holding up the card front, I adhered it with foam squares to the bottom inside of the card. When adhering the stamped panel to the front, the most important part is to remember that you only need to glue on the bottom half, lol!


While this card is on the smaller size -around 4" square - it is simple but eye catching!


As you can see, I added blue sky and green grass to the background of some of the pictures in the "collage" and shaded with darker colors for some depth.


On the inside, above the "stopper", I stamped the second sentiment from the set also in the same brown ink.


That's it for me today...things are slowly getting back to "normal" around here after returning from our wonderful vacation. Until next time~