Showing posts with label anniversary. Show all posts

Monday, January 22, 2018

Celebrate Love


Today's design team post uses the sketch from Atlantic Hearts and will also be entered @ Just Add Ink for "Just Add Something New", @ Alphabet Challenge for "V for Vellum", @ heARTful Stamping for "Anything Goes + a Stamp" and @ 613 Avenue Create for "Anything Goes/ Something New".

This card is a 5 x 7 size and the dry embossing was done using a reversible embossing folder from Spellbinders.


The something new that I used for this card is the "Amazing You" stamp set that I just got FREE from Stampin' Up during their Sale-A-Bration sale going on now until the end of March...for every $50 you spend you get something for free! ( Click on the sale brochure to the right on my blog for more info!) The flower and the sentiment on the card front both come from this awesome stamp set. The flowers I colored with my Spectrum Noir markers and fussy cut out to layer on the card front.


The gold glitter enamel dots are self adhesive, came from CTMH and made the perfect accent for the card front.
The inside sentiment comes from an Anniversary sentiments set from MSE, but the half circle blue burst is from the free set from Stampin Up that I mentioned above.


You may recognize that the green leaves dieut frame is from the December Paper Pumpkin kit...I used it in this card here last week too, but it looks completely different! The sentiment was stamped on Vellum in black pigment ink and then heat embossed using holographic powder, so it shimmers and changes color when moved around in the light -very pretty in person!!!


Until next time~


Monday, November 27, 2017

A Clean & Simple Anniversary Card for Atlantic Hearts Sketch Challenge


Today's design team project was a quick and easy one using the sketch from Atlantic Hearts and it will also be entered @ Less is More for "Let It Shine", and @ Addicted to Stamps for "Monochrome".


This project used a lot of things I've had in my stash for a good long time! The Diecut flowers were from a Close to My Heart scrapping kit, the patterned paper from the Current catalog, the flower trio punch from Stampin' Up and the silver glitter paper was left over from the snowflake project I shared in this post previously.


The card base was made from an A2 sized white, horizontal, top folding piece of heavy weight cardstock. I cut the tan patterned papers according to the sketch and adhered them flat to the card front. Using 2 nesting oval dies from Spellbinders, I cut the silver layering oval and the white oval for the sentiment.


I punched the same style flowers from the silver glitter paper and layered them to the cream and tan CTMH die cut flower elements. I then stamped and heat embossed the Best Wishes (retired from TAC) on the white oval using Versamark ink and Platinum embossing powder.


After assembling and layering the flower dies with the punched flowers, I accented them with left over gold leaf stickers from a past Paper Pumpkin kit. I also added a tiny clear rhinestone sticker to the center of each flower for some additional glitz.


I think the clean lines and simplicity of this card give it a subtle elegance just perfect for celebrating my sister-in-law and her husband's marriage that has successfully lasted many years!


Inside I stamped the sentiment from a My Sentiments Exactly Anniversary stamp set in gray ink and accented it by gluing on 2 more of the punched silver glitter flowers.


That's it for me today, until next time~


Wednesday, November 1, 2017

A Sparkly Love Anniversary Card


Today's card was designed for the Mix It Up Challenge Blog November Design Team with the optional technique of "Stenciling" using the sketch from Sunday Stamps as my inspiration. It will also be entered @ Crazy 4 Challenges for "Using Pink" and @ heARTful Stamping for "Anything Goes + a Stamp". 


The first step in making this card was to stencil the polka dots design on the front of an A2 sized horizontal top folding card made from Bristol cardstock for it's sturdiness qualities and ability to take the wetness from the gel medium well. I used Frog tape to secure it to my work mat and then used a palette knife to evenly spread the matte gel medium across the stencil on the card front. I then carefully pulled the stencil off and sprinkled the crystal glitter all over the wet gel. I also rinsed the gel off the stencil right away! I then set this aside to dry while I worked on the other parts of the card.


 I stamped and heat embossed the blooms from Close to my Heart in Silver Pearl powder, colored them with watercolors and cut them out using the matching die set once they were completely dry.


Using the sketch as my guide, I trimmed the vellum layer and added the washi tape banner. The "love" was die cut from some DCVW holographic paper I bought at a stamp and scrap store while we were on vacation in Bermuda.


There is so much sparkle and shimmer on this card -I just LOVE it, lol! As you may be able to see here, I even added clear wink of Stella to the blossoms.


Once everything was assembled, I wrapped the silver thread around the card front 2 times, tied it in a bow and secured it with a mini glue dot. The bloom was adhered with foam pop dots, but everything else is glued flat.


Inside, I stamped the sentiment in London Fog Memento ink and added the embossed and die cut blue bloom. This card will be going out in the mail to one of my sister-in-laws and her hubby in the next few weeks.


Until next time~


Friday, September 1, 2017

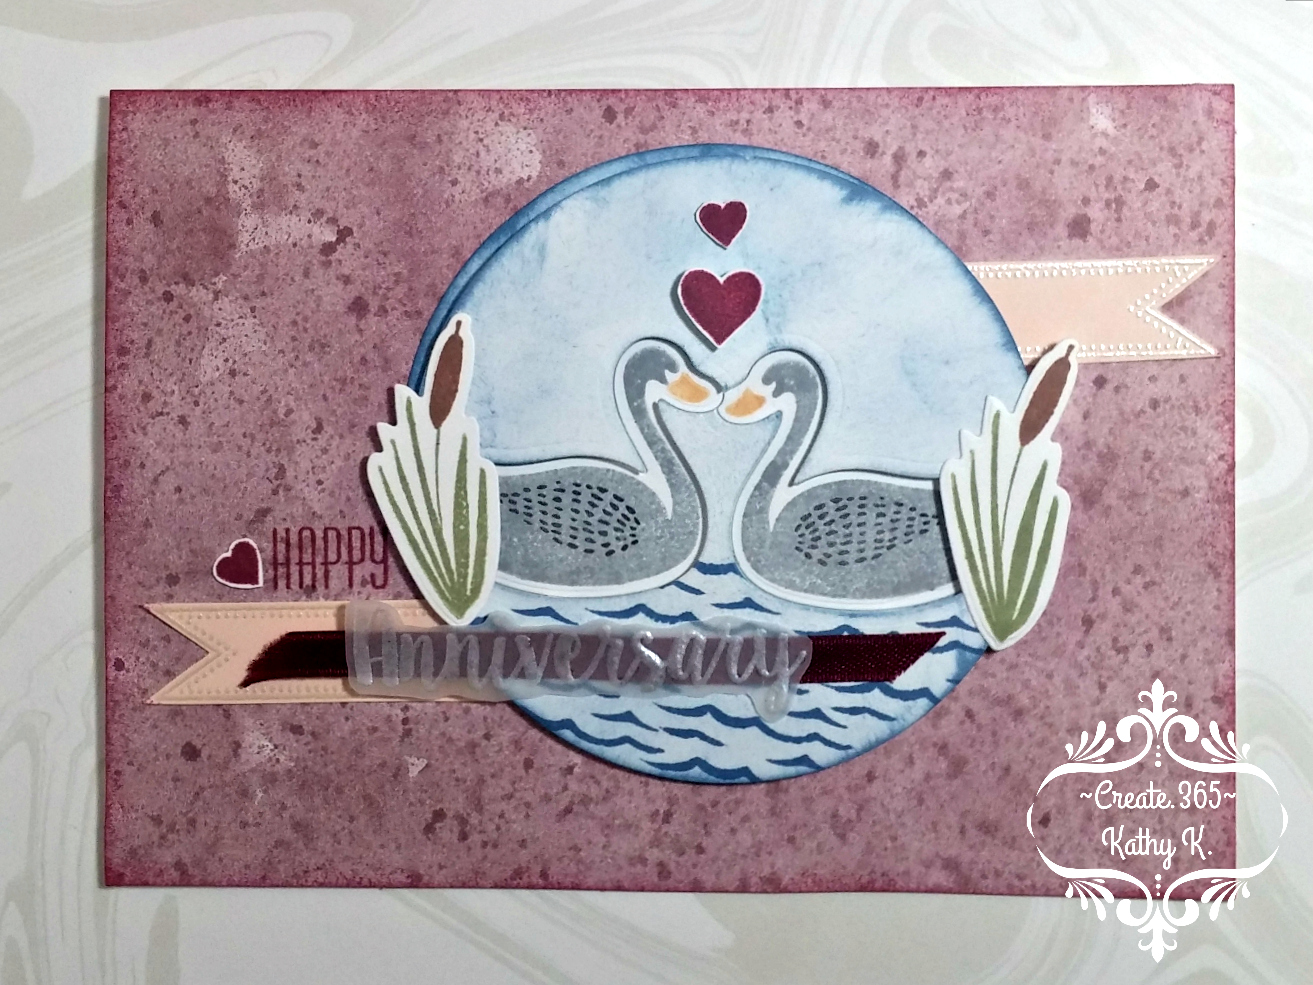
Swan Anniversary

Today's card was designed for the "Inlaid Die-Cut" challenge @ the Mix It Up Challenge Blog and inspired by sketch #271 @ Hand Stamped Sentiments. I will also be entering it @ Fashionable Stamping Challenge for "Use Your Inks Any Way You Like". As I said last week, October is a busy month for wedding anniversaries for our family -so here is Anniversary card #2...


All the stamps and dies used for this card are from Close To My Heart and the circle cutting tool is from Creative Memories. I made the card using an A7 size white card base and covered it with a wine colored patterned paper from my stash of 12 x 12 sheets.


I trimmed 2 circles of the same size -one for the front layer and one for the back layer. The front layer is where I did the stamping and the die-cutting. Using a stamp positioning tool with layering stamp sets is such a Godsend! I used two different shades of gray dye ink (Memento and Stampin' Up!) to stamp the swan body and the wings. I saved the beak for last -so much easier to do it AFTER you've die-cut them out!


Once I had them die cut out of the front circle I carefully blended 2 colors of blue Distress inks -using the lighter color (Stormy Sky) at the top for the sky and the darker color (Faded Jeans) at the bottom for the water. I then stamped the waves also in the darker ink across the bottom.


I also stamped the cat-tails in two steps -the green first and the brown after I had them already die-cut out. The banner was stamped twice on the soft blush/petal colored cardstock and heat embossed in Pearl White before being fussy cut out. (Wine and Petal were the featured colors at my daughter's wedding last October and that is why I chose these colors for their card)


After assembling all the basic layers, including the wine colored ribbon, according to the sketch, I stamped "Happy" in wine ink and heat embossed "Anniversary" in Pearl White on a piece of vellum.


To get the inlaid die-cut look, I adhered the swans flat to the back circle that I had blended the lighter blue Distress ink over and then popped the top layer up around it using foam tape. I also stamped the hearts in wine ink and fussy cut them out -popping just the biggest one up with a mini pop dot.


Although this card took a lot of steps to complete, I was so pleased with the way it unfolded...I'd had a vision in my head of what I wanted to do and just wasn't sure if I could pull it off, lol. But I am happy to report that I did it!


Inside I kept things nice and simple, stamping the sentiment and the tiny heart in wine ink and that's it! My daughter and I both love the Nicholas Sparks book and movie of The Notebook, so I am hoping she will catch the Swan reference, but if she doesn't that's ok too. I love swans for the symbolism they represent of a lifelong love -I even have a swan charm on my Pandora bracelet. Because I love them so much, I just had to have this stamp and die set when it went on sale last month!


Until next time~


Friday, August 25, 2017

October is for Anniversaries

Today's card is the first of several I will be making for wedding anniversaries in our family during the month of October...as of last count there are at least 3 and another nephew's wedding coming up this year too! For this one, I was inspired by the sketch @ Retro Rubber, the "Layer It Up" challenge @ International Art & Soul, the "Wood is Good" challenge @ Shopping Our Stash and the "Things Beginning With B" challenge @ Moving Along With The Times.


The stamps I used here are all at least 10 years old and a mix of Stampin' Up and The Angel Company. The paper too is long retired from Basic Grey in various golden and red wood grain patterns.


The A2 card base is made from an off white aspen flecked cardstock and all the layers were added flat using the ATG gun after cutting them according to the sketch. Then, to achieve another layer of layering I pealed back the layers on the bottom right corner and tore them off to make a distinct area for my sentiment to be embossed in antique copper powder...you'll be able to see what I mean much better in the close up picture further down below.


All images were stamped in Rick Cocoa Memento ink and colored with Prismacolor pencils. The covered bridge panel was aged and distressed along the edges using Vintage Photo Distress Ink and then heavily spritzed with Pearl Mica Shimmer Spray. While the camera doesn't pic up that shimmer, it is very pretty in person...making the bridge appear soft and slightly out of focus -which I think just adds to the vintage appeal.


I really debated whether or not to add gold sequins or something to this card, but decided it didn't quite fit in with the vintage vibe I was going for, so I decided against it in the end.


Inside you can see the flecked texture of the card base fairly well...I stamped, colored and distressed there too, to continue with the card's theme. That's it for today...enjoy your weekend!


Until next time~


Wednesday, July 19, 2017

Cheers to Us!

Today's card was inspired by sketch #330 @ Try Stampin' On Tuesday and by the Tic-Tac-Toe challenge @ Tuesday Throwdown where I went with the middle horizontal row and used the theme of "Silver -Sparkle -Wedding/Anniversary". I will also be entering it @ A Perfect Time to Craft and @ Through the Craft Room Door where "Anything Goes".


Today's card was made on a white A7 side folding vertical card base. Black cardstock and old red patterned paper from CTMH were trimmed for the first layers. I die cut the ornate label from white shimmer cardstock and stamped my Unity Stamp Company girl on a scrap of plain white cardstock. I hand trimmed the banners according to the sketch from scraps of black and white glitter papers and adhered them to the bottom left of the card front -overlapping according to the sketch.


I die cut "cheers!" twice -once from brushed silver metallic cardstock and once from white fun foam. I then used small amounts of the Best Glue Ever to glue the 2 diecut pieces together for added dimension.


Using watercolor pencils to color the Unity girl, I blended with a Dove pen and then added glimmer and glam using the Gelly Roll Stardust pen on her bracelets and the clear Wink of Stella pen on the wine glass. I ended up fussy cutting her out and mounting her separately on top of the white shimmer label using mini foam dots to add it all to the card front.


I added some bling using clear rhinestones is three sizes to accent the focal point.


The last step of bling was to cover the focal point so it wouldn't get dirty and splash FSJ's Silver Silk across the card front for a bit of glittery grunge look.


Inside I added some extra banners and did a bit of stamping and watercoloring. I was making this card pretty late at night and was very tired -the last thing I did for the whole card was stamp the "Happy Anniversary" at the bottom...and boy did I ever manage to get that crooked -I blame my tired hands and eyes at this point, lol. But since it is handmade, I will leave it as is  and just claim that it is "perfectly imperfect"!!!


My hubby and I are celebrating 26 years of marriage in a few weeks -so I will be putting this card aside to give to him in August. Until next time~