Wednesday, November 29, 2017

Let's Celebrate ~Upcoming Blog-iversary!!!


WOW - I can't believe that in 5 short days I will be celebrating the 1 year anniversary of this blog! I have so much to be thankful for this past year...I have learned far more than I ever thought possible and I am very pleased with where my love of paper, stamps and ink has taken me. I never dreamed I would be a design team member for both challenge blogs and product companies. I didn't think I'd be teaching classes again either, but I do love to share this journey with others so I guess teaching is just a given for me.


Along the way I have also learned some things that I will be putting into practice to help keep my blog inspiring and my crafting time more productive...because, let's be honest here...I would much rather be creating than typing, lol.


 Some of the changes I will be making are going into effect beginning today...the most obvious being that not every post I make will be a step-by-step tutorial. I want to be able to provide more inspiring and creative content for you and the only way to do that is for me to create more and type less. Editing photos and blog posts takes me hours (maybe I am just slow...a champion typist I am NOT) but I would rather give you more pretties to look at with less how-to instructions.


So, unless the project is for a specific design team that requires a tutorial, I will just be sharing the project through lots of good photos and the supply list when applicable. Remember that you can always comment and ask questions if you'd like more detailed design info -I read every comment you leave me, so don't be afraid to reach out!


I hope that by doing things this way, I can bring you inspiration more than just 2-3 times a week. Today's cards were made using another Paper Pumpkin kit from 2015 that I finally got around to using. I took this kit with me to work on when I was visiting with my mom and my grandma and then I messed it up while I was talking, lol...I stamped "congrats" on the green banners instead of "thanks", so I had to do a bit of custom design work to fix things. But I am pleased with how things worked out in the end. 

Now that it is getting dark outside so much earlier in the day, I love sitting at night and working on my Paper Pumpkin kits or coloring images while hubby watches TV, so I look forward to sharing more things like that with you in the near future. Thank you from the bottom of my heart for reading my posts and following me in my paper crafting journey...if you feel so inclined, also take a look at the Stampin' Up website (link is in the right column here on the blog) where you can also support my small home based business by purchasing the supplies you need to create your own handmade paper projects. Until next time~


Tuesday, November 28, 2017

How to Make a Gorgeous Foiled Christmas Tree Card


Today's project is a gorgeous holiday card made using lots of "magically perfect products" from ScraPerfect


This card is a 5" x 7" (A7) white base with a kraft panel cut from cardstock for the front. Using the Best Glue Ever, a sponge and a beautiful tree stencil from The Crafters Workshop, I gently applied the glue through the stencil to just the tree image on to the kraft cardstock.


After carefully pulling the stencil away, I let the glue dry until it was tacky and clear -this took about 45 minutes...it may have actually taken less time, but I got involved in another project and knew that extra time to dry would not hurt my tree project.


The next step was to lay the green Transfer Foil down on top of the glue stenciled tree design with the green side facing up. Burnishing it well is the key here to capturing all the details! 


Gently peel the foil back to reveal your design! You can now save the rest of your foil sheet for another project.


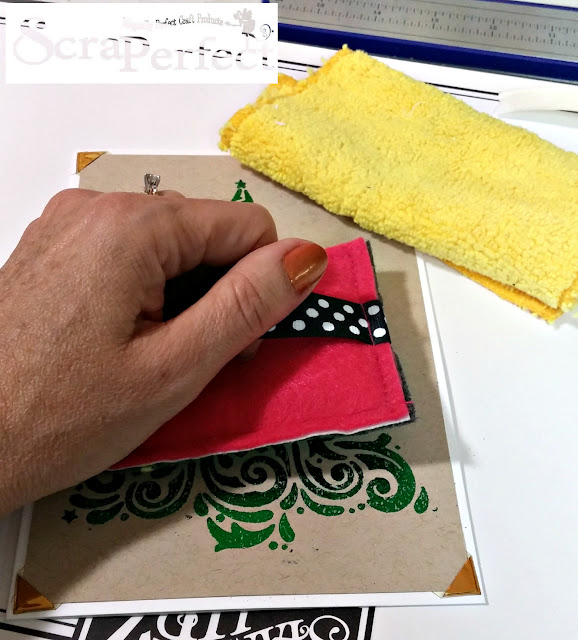
Because of the nature of this project, there was still a bit of sticky residue coming through the foil, so I lightly tapped the Perfect Crafting Pouch all over the tree to de-stick it and then buffed the tree gently using the Perfect Cleaning Cloth to ensure no residual powder was left behind to dull the shine of the foil.


Now, of course we can't forget that we still need to clean all that glue off of our stencil and I have the perfect tool for the job in the Best Cleaner Ever. I first laid my stencil on top of a paper towel, but learned that wax paper works much better for this step because it doesn't soak up the cleaner-so learn from my mistakes if you give this technique a shot! 


I generously spritzed the cleaner over the stencil and carefully spread it around using my fingers then left it to soak for a good long time...ok, I gotta be honest here, I just plain forget about it until several hours later, lol. But it did the trick and I was then able to wash the glue and the cleaner off in warm water.


I stamped and gold heat embossed the sentiment from Stampin' Up!... you can see that the shine and texture on this card really packs a punch!


Layering the kraft panel to the card front using self adhesive gold foil photo corners was the perfect accent for this clean and simple card.


I heat embossed the sentiment inside also and that finished off this card quickly and easily.


That's it for me today and I hope you will give this stencil/foil technique a try -it is alot of fun and the hardest part is cleaning the stencil, lol. Until next time, happy crafting with ScraPerfect!


Monday, November 27, 2017

A Clean & Simple Anniversary Card for Atlantic Hearts Sketch Challenge


Today's design team project was a quick and easy one using the sketch from Atlantic Hearts and it will also be entered @ Less is More for "Let It Shine", and @ Addicted to Stamps for "Monochrome".


This project used a lot of things I've had in my stash for a good long time! The Diecut flowers were from a Close to My Heart scrapping kit, the patterned paper from the Current catalog, the flower trio punch from Stampin' Up and the silver glitter paper was left over from the snowflake project I shared in this post previously.


The card base was made from an A2 sized white, horizontal, top folding piece of heavy weight cardstock. I cut the tan patterned papers according to the sketch and adhered them flat to the card front. Using 2 nesting oval dies from Spellbinders, I cut the silver layering oval and the white oval for the sentiment.


I punched the same style flowers from the silver glitter paper and layered them to the cream and tan CTMH die cut flower elements. I then stamped and heat embossed the Best Wishes (retired from TAC) on the white oval using Versamark ink and Platinum embossing powder.


After assembling and layering the flower dies with the punched flowers, I accented them with left over gold leaf stickers from a past Paper Pumpkin kit. I also added a tiny clear rhinestone sticker to the center of each flower for some additional glitz.


I think the clean lines and simplicity of this card give it a subtle elegance just perfect for celebrating my sister-in-law and her husband's marriage that has successfully lasted many years!


Inside I stamped the sentiment from a My Sentiments Exactly Anniversary stamp set in gray ink and accented it by gluing on 2 more of the punched silver glitter flowers.


That's it for me today, until next time~


Thursday, November 23, 2017

Giving A-Latte Thanks


 In celebration of Thanksgiving and in collaboration with the Itsy Bitsy design team, today I bring you a multi-textured, fancy folded pocket Thank You card!


I started today's project with 2 square White Card Blanks that are about 6" x 6". I then cut the corners off the opposing sides... 


 and glued them together with the folds on opposite sides and the squares over-lapping. 


Next I traced, cut and glued two triangles from the Retro Color Stripes Napkin to the front of each triangular flap.


Using a piece of  white cardstock, I trimmed a 5" x 5" square for the inside card panel and covered it also in a piece of the striped napkin. From the Natural Burlap Stack, I cut a 4 1/2" x 4 1/2" square from the black flower print and glued that on top of the napkin layer.


I then cut two Vintage Doily Thin Cut shapes from black cardstock using my die-cutting machine.


I glued all three of the bottom sides from the first part of our project together to make a pocket envelope for our card. Then I glued the 2 black doilies together around the top of the card insert to make the pull tab so that it would be easier to remove from the pocket.


Using a circle punch, I cut a white circle to layer on the pull tab and stamped "thanks" on it in black ink before I glued it on. Look at all the lovely detail you get from that doily die -LOVE it!!!


To decorate the card insert, I cut a triangle from white card to stamp my latte cups on using the new Donuts and Treats clear stamp set.


I knew I wanted more than one cup, so I stamped the image that I wanted in the front down first using Black Chalk Ink. I then stamped it once again on a small piece of sticky Post-It-Note paper and fussy cut it out to make a mask for stamping in the foreground. Placing that blue masking image over my first cup ensured that the lines don't cross of the images when I stamp one more on each side...instead, it looks like they are stacked behind the first cup.


I stamped those adorable little faces and some hearts next, then colored them with Colored Pencils.


To help this image pop from the background, I sponged some of the black ink around the edges before I adhered it to the burlap using the mini sized Foam Dots.


Once everything is assembled and tucked into the pocket, the main image is hidden, so it is a surprise until you pull up on the doily tab!


So cute when the little trio of latte cups pop out! 


That's it for me today - I hope you remember to give thanks for all the good things you have in your life and happy crafting with Itsy Bitsy!


Tuesday, November 21, 2017

Thanksgiving 2017: Personalized Table Tent Cards


Today's project was a fun one created using a long ago retired Stampin' Up! Paper Pumpkin kit from September of 2015 that was sitting in my stash untouched and just begging to be put to good use! The photo below is what the kit was intended to create...but I went a bit rouge this time and made some table tent cards for Thanksgiving dinner instead, lol!


These cards are small -3" x 3" square. So I started by cutting 10 pieces of the orange cardstock 6" x 3" and running them through my machine with the falling leaves embossing folder. I then scored them at the 3" mark and folded them in half.


Using the tags, the stamps and the ink from the kit, I made 10 layered tags.


I then used my Creative Memories Wave Cutter to transform the large fringed piece you see on the left into the smaller piece you see on the right. this was not an easy task because the fringes keep wanting to get pushed out of the way instead of getting cut...but I persisted and pushed through until I had enough for each card. I did have to clean up some of the cuts with a small pair of scissors, but that didn't take too long!


For the girl's cards, I used the pumpkin colored ribbon to hang the tags and for the boy's I used the raffia -both were part of the original kit.


I then used a fine line black pen to write everyone's names along the bottom -stamping the dotted detail on either side in black ink. The finishing step here was tracing over their names in a sparkle gel pen for a tiny, subtle bit of glimmer.


For the inside greeting I die cut a label, sponged ink along the edges and stamped the retired greeting from TAC in that same ink.


Today's project will be entered @ Glitter 'N' Sparkle for "Thanks/Thanksgiving", @ Use Your Stuff for "Thankful", @ Dream Valley for "Add Texture" and @ Always Fun for "Thanksgiving".


Until next time ~Happy holiday crafting & have a blessed Thanksgiving~