Friday, March 31, 2017

Spring Espresso

Today's card, like yesterday's card, was inspired by many different challenges...but unlike yesterday's "time intensive multi-media exploration" creation, this one came together super fast - Woo-Hoo!!! I used sketch #490 from Mojo Monday, took my color cue from the STAMPlorations "Anything CAS Goes -Sky Blue color twist" challenge...I didn't use any die-cuts per the CAS-Fridays "CFC#170 No Dies Allowed" challenge and I kept it coffee themed so that I could link to the Spring Coffee Lover's Bloghop one last time, lol. This is my 3rd and last coffee themed link-up card for the Spring Hop -Enjoy!


Starting with a top folding white A2 size card base, the first thing I did was pull out a pre-made panel that I had left over from my watercolored background making session that I showed you in the Under the Sea post earlier this week. So if you want the details on how I made it, just click on the link and have a quick look around to get the main idea. This particular piece was a third generation block stamping...so made with more water and less ink than the Under The Sea card was.


I stamped the cup outline and the Espresso sentiment (from a retired photo-polymer stamp set by CTMH called "Coffee Shop") in Versamark ink on the watercolor panel after rubbing it with my anti-static pouch tool. I then heat embossed it with silver embossing powder. 


Next up, I tore the edges of the watercolored panel and trimmed the sky blue patterned paper (from yet once again that same vintage DCWV mat stack pack) and the white core aqua textured cardstock to size using the sketch as my guide. I then used my Heidi Swapp Edge Distressor tool and ran it heavily along all the sides of both those layers to curl and fray up the edges for some added texture and visual interest. 


The creamy white ribbon was adhered (using my ATG gun) on the back side of the card after the layers were adhered and since I wanted to keep it simple, I went with what I call a "cheater knot" for the accent...this involves taking a short piece of ribbon, looping it under the previously adhered ribbon strip, tying a simple knot on top and sliding it in place where you want it.


The watercolored and embossed panel was then adhered on top of all that using 6 thin, low profile foam dimensionals from SU!.


Inside, I made use once again of the leftover scrap patterned paper and stamped the "Perk Up" sentiment from a retired set by the same name from A Muse Studio stamps in Black Beauty die ink. This card is now all ready to be mailed out to one of my May card swap partners. 


Thursday, March 30, 2017

Java Hello

Today's card was a fun experimentation for me...my first time ever using gesso!!! The card was inspired by many things...but mostly the sketch +"Stamps & Spring" theme challenge @ STAMPlorations (a great company I just discovered -my first "Gold Club" order is on it's way-with a coffee stamp set, of course -woohoo!), the mixed media theme challenge: "Books" @ Happy Little Stampers + my love for coffee & the Spring Hop @ Coffee Loving Card Makers. Whew -that's alot of inspiration -so we better get started!


Alrighty, so this card took me a very long time to make...not because it was difficult to do, but because it took me FOREVER to make up my mind about what I wanted to do, lol. I started with a white A2 side folding card base, a badly beat up old Rob Roy book left over from some crafty decor from my daughter's wedding last fall & a super brightly colored patterned paper pack from Colorbok.


I followed the sketch to trim my patterned paper and used the YES glue to adhere both the book page and the patterned paper...this glue is fantastic because it is easy to brush on, always dries flat (even on thin paper) and cleans up easily with just water. I have had it for about 15 years and it's still going strong!


Next I brushed the entire card front with gesso to tone everything down and tie the two vastly different paper sources together. I love that the gesso also adds some subtle texture. (I was debating at this point whether or not I wanted to use a stencil and some modeling paste too, but decided against it.)


Next up, while letting the gesso dry, I die cut the rectangles...the magenta one with the stitching detail and the black floral without, cut out the half circle and the black script "hello". I stamped the magenta rectangle repeatedly with the row of coffee beans (from a Fiskars clear stamp set) in black die ink and then lightly sanded the edges to give it a distressed look. I stamped the Java Mug (retired from The Angel Company) on the half circle and used the distress inks (Peacock Feathers & Picked Raspberry) to add some subtle color to the edges of the card front with the distress tool. Working on my Ranger craft mat was great -everything wiped right off with a baby wipe...but I think I need the larger sized mat, lol!


For finishing touches, I also used the distress inks and tool to add color to a white fabric flower that I adhered a black brad through the center of. I added Crystal Lacquer to the white mug and used Wink of Stella pens to add some subtle shimmer to the donut icing and the spoon handle. I added just a hint of barely there color to the coffee and the donuts with my Prismacolor pencils in shades of brown.


I wrapped some thin black sewing thread around the card randomly several times and made a triple bow with black Scrapper's Floss that I tucked behind the rectangles. I used my Xyron "X" Sticker Maker to make adhering the Hello die cut super easy and used foam dots for the magenta rectangle and the flower.


On the inside, I stamped the sentiment and coffee grinder from that same TAC retired stamp set in more black die ink and added some of the distress ink to tie it all together. This card is now ready to go out in the mail to one of my May card swap partners. I had a blast making it, so I'm sure that you will be seeing more mixed media inspired projects from me in the future! :)


Wednesday, March 29, 2017

Sew Happy Birthday


Today's card was inspired by the sketch challenge @ Connie Can Crop but will also be applied at Cards 4 Galz "Pretty in Pink" and @ Dare2BArtzy "Lots of Layers".


This card was made especially for my mom's birthday last Friday -she is a talented seamstress and makes the most incredibly gorgeous hand stitched quilts! Since I didn't have any quilter stamps in my stash, I made do with this retired set from The Angel Company instead.


I used 2 ink pads for this card -a Basic Gray from Stampin' Up! and a light tan Palette hybrid ink for the distressing/antiquing. The pattern paper came from the DCWV mat stack that I have been using a lot of lately and the main cardstock is a creamy color with some specks & threads running through it, that I thought would be just perfect for the feel I was going for with this card.


I cut my middle panel of cream into 3 equal pieces and randomly stamped the sewing kit images across the pieces, then colored them with Lyra Aquacolor Crayons and a Dove blender pen for a soft, antique look.


To add texture to the card front, I diecut a tag from kraft cardstock and then ran it thru my embossing machine with the herringbone folder. I then tore the bottom off, tied it with some twine and distressed it by rubbing over the top with the tan Haystack pad. I also did that with the piece of twill tape to give it a bit of an aged appearance. 


The heart die was used to diecut, but not emboss the shape for stamping the sewing machine onto in the gray ink. The lace trim was a small piece I had in my stash from decades ago and I easily adhered it with the adhesive from my ATG gun. I tied some cream Scrapper's Floss through the button before I used a mini glue dot to adhere it to the card front.


As I built up the layers on the card front, I was careful to make sure everything looked balanced and was adhered securely...using the sketch as my guide, it was super easy to do. I stamped the sentiment on a strip of the cream cardstock and distressed the edges by sponging on the tan ink. The sewing machine was colored with the same watercolor crayons as listed above and popped up last with some foam dots for added dimension.


Inside I used the left over piece of patterned paper from the card front and stamped the sentiment and some supporting images to finish everything off. Because of the dimension, I chose not to mail this and instead it was hand delivered on Monday afternoon...I think she liked it. :)


Monday, March 27, 2017

Under the Sea

Today's card was inspired by the sketch from over at the My Favorite Things challenge blog and will also be applied for challenge M2217 "Anything Goes" @ The House that Stamps Built blog, the Simon Says Stamp Wednesday Challenge "More Than One Die or Punch", & the Artistic Inspirations challenge #175 "Just for Fun".


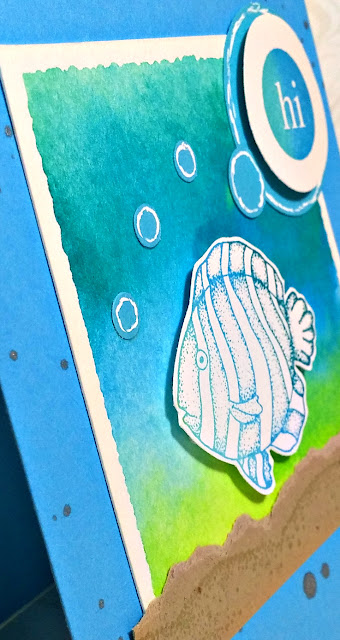
This watercolor technique was one I have been wanting to try out for a while now, because I want to share it in my library class in the month of May...so I pulled out all the supplies and got to work. Using the Kaleidacolor Caribbean Sea rainbow ink pad made achieving the color gradation super simple. All I needed then was a mini-mister, an acrylic block and some watercolor paper. I also made good use of some old circle punches I had in my stash, along with a standard office hole puncher. The stamps are retired and from several sets I have left from my days with The Angel Company.


To achieve that beautiful background look, I "closed" the stamp pad to join the colors together and then stamped my acrylic block directly with the ink pad as you can see below. The top sample was my trial run, and then I did it several more times to see the variation that could be gotten-depending on how much water you used vs. how much ink was on the acrylic block.


After inking up the block, I misted it with water from the mini-mister and then stamped it onto my water color paper. Easy-peasy way to get a beautiful Under the Sea background for my fishie.


I sped up the drying process a bit with my heat tool and adhered the water-colored background to the top of the card after I splashed some Silver FSJ Silk across the front of the turquoise card base. I stamped the sand in tan die ink onto a scrap of kraft cardstock, tore along the top for texture and adhered that to the bottom of the background. (the other half will be used inside the card later-see last pic below)


I outlined the punched circles with a Uniball white gel pen to turn them into bubbles, stamped "hi" in the rainbow ink on a white, punched circle and popped it up on to the largest aqua circle with foam dots. I stamped the fish in the rainbow ink also and fussy cut him out so that I could use foam dots to pop him up right above the sand.


To finish everything off, I used the other half of my sand cardstock scrap on the inside of the card and stamped several pieces from the sealife stamp set along with the "You Make Life Fun" sentiment in black ink. I hope the ladies at the May library class enjoy making this one and trying something new with this water-colored background technique.


Mix It Up Design Team Announcement!!!


I am so very excited to announce that I was notified just yesterday that I have been chosen to be a member of the "Mixed Up Girls" design team over at the Mix It Up Challenge Blog. This is a brand new challenge blog where we invite you to play along with us every month. Our challenges run from 6am EST on the 1st to 6pm EST on the last day of the month. You can enter up to 5 projects and combine it with as many other challenges as you'd like. All of our challenges are Anything Goes -with an optional Twist...each month we will feature a Technique as the optional Twist and you may choose to participate or not. Create a 3-D, mixed media, scrapbook or card project...the choice is your's. Just get started on your creative journey and then please share it with us! Our first challenge begins on May 1st, 2017...hope to see you there!!! :)


Saturday, March 25, 2017

Birthday Balloon Chickie

Today's card was inspired by the sketch @ Reverse Confetti but will also be applied to the Birthday theme for Andrea @ the SIP Challenge and Anything Goes @ Word Art Wednesday. In April, I will send this card to one of my niece's to celebrate her 7th birthday!


I began this card by laying down some light blue ink thru a Tim Holtz Stencil using my sponge dauber tool and some stencil tape to hold everything in place while I worked on the front of a side folded A2 white card base.


I chose a pastel glittery striped cardstock from the DCWV mat stack and stamped the retired TAC "Happy Birthday sentiment on blue scraps I trimmed up from my stash.


The adorable little chickie is from a small stamp set I just got from Unity Stamp Company that is called Bright Little Chick. I joined the Stamp of the Week Club at Unity and this little cutie was the first one I received. Now, once a week, I am sent a gorgeous, brand new, cling mounted red rubber stamp set for less than $8 (including shipping!) + I get a discount on all the past Stamps of the month = LOVE, LOVE, LOVE Unity Stamp Co!!! They are a small, family owned & operated company in Minnesota and your stamps will be "cooked to order".  I can't say enough good things about these folks -so please go check them out for yourself!


The balloon stamp is from a retired hedgie set from TAC, but was the perfect size for this card, so I stamped it twice in black ink on white scraps and colored them up with my Spectrum Noir markers. I did the same with the chickie, but then masked him so that I could stencil behind him on the circle I punched out.


 I used the scallop scissors to trim a vellum circle layer to go behind him and after trimming the balloons, I covered them with Crystal Lacquer and sprinkled them with clear glitter. I used some twine for the balloon strings (the ends were secured by a mini glue dot) and popped up the chickie and balloons with foam pop dots...the other layers were adhered with my ATG gun. (man, I love that thing!)


I outlined the chickie with a clear Wink of Stella marker for a bit of shimmer and traced over the sentiment and the pink bow-tie with a clear Sparkle Dust Gelly Roll pen.


For the inside, I punched more circles out of scraps and after die-cutting the number 7, I ran it thru my Xyron sticker maker -facing down- so that I could apply prisma glitter to the surface. A little bit of multi glue to adhere it and this card is now ready to go out in the mail!